Here's the Wiimote hanging:

Here's the UPC of the package of clips I bought:

And the front of the package. Suspend-It mounting clips.

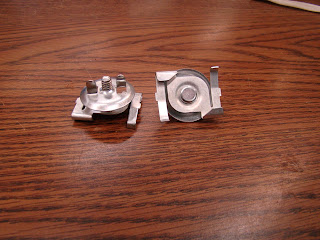
Here's the clips out of the package:
Here's a shot of the PVC pipe hanging from the ceiling. I drilled a 1/4 inch hole in a PVC T connector, used a lock washer and nut that screwed onto the 1/4 inch screw that comes out of the bottom of the ceiling clip, then attached a length of PVC pipe so that the Wiimote hangs at the right level.

And here's a close up of the clip, clipped onto the T-bar on the ceiling. It just snaps into place and holds very well. We're only looking to hang a pound or so; PVC pipe, connectors and Wiimote, so it doesn't have to be heavy duty.
 Here's a close-up of the Wiimote hanging. I used white electrical tape to hold a magnet onto the PVC pipe and another onto the back of the Wiimote. I tried using superglue but it did not hold. The tape doesn't look as nice, but works great. I think in the future I'll do a prettier job of taping it up.
A close-up of the magnets taped to the PVC pipe and Wiimote. Yeah, not pretty, but functional. I used rectangular magnets that I bought at an electronics supply store for 25 cents each. They're surprisingly strong and allow for excellent positioning.
 Since I didn't use the glue stuff to permanently stick the short bit of PVC pipe into the T connector, I can rotate it to aim it just right. I stick the short length into the connector but not quite all the way, allowing it to twist when I crank on it. It's a good hold though.
 I run the whole thing from a USB Flashdrive, and connect it and the BlueTooth dongle via a little hub. This works pretty well so far, and is portable to show off to other teachers.
If you have any questions, feel free to drop me a line, post a message on the blog, or ....well, those are pretty well your only options.


